Yep, thats the little sucker. To swap the ODO readings is just a matter of copying the first line of hex from one dump to another. Easy done. Calculating the ODO...well...thats another matter all together and far more complicated.
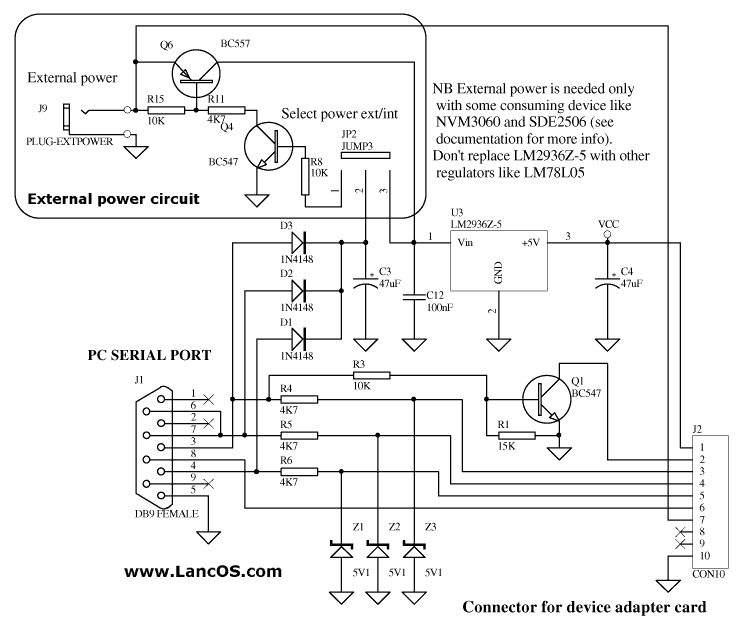
I'm using a very basic serial programming circuit for the 93Cxx eeproms as I was too impatient to wait for a 'proper' programmer to arrive. http://www.lancos.com/e2p/siprog_base.png
I've just been using pony prog to read / write to the devices. Its quick and easy.....and normally doesn't cause grief.
Interior Modifications
BA Falcon Instrument Cluster EEPROM Programming
![]() by TazzI » Mon Mar 23, 2015 7:04 pm
by TazzI » Mon Mar 23, 2015 7:04 pm
I assume thatll work fine.
Dont expect any help from the seller since they probably aren't the actual developers. And even so, probably arent going to go out of their way for a cheaper unit.
Should be fine anyways

![]() by Robertau » Thu Mar 26, 2015 3:59 pm
by Robertau » Thu Mar 26, 2015 3:59 pm
Rerouter wrote:And for the love of... buy one of these already rather than risking tearing an eeprom in half,
http://www.ebay.com.au/itm/858D-Desolde ... 1609993734 , combine it with some pen flux and leave it set to 300 degrees,
If you must use an iron, then add excessive solder and lay the iron along the troubled side, its most likely the ground plane causing an issue on a ford, so you will need to get a ridiculous amount of heat into that piece of copper,
Got one of those soldering rework stations myself , it arrived today, Knock of off the atten 858d. kind of wish i had looked more at the available ones.
2 things i hate about it.
1) Power lead is hard wired to the Unit, i prefer them to be through a IEC socket.
2) Hand piece is hard wired to the unit, again i prefer these removable for storage and bench space reasons
Both of these issues can be solved, have some salvaged IEC sockets, the issue with the hand piece can likely be solved, i have some panel mount connectors things for that too.
Not in a hurry to change these problems but I'm sure they will be "fixed" in the long run
Other than that i think I'm happy, seems to work right, powers up and blows hot air at the varying speeds like it should.
Now i have finished winging lol, what temp should i have it set at Thinking about 300 with that lead solder they use these days. nozzle size should i be sticking with the smallest one?
i should probably find a board to have some practice on.
Thanks guys
Robert
- Robertau
- Starting Ignition
- Posts: 67
- Joined: Mon Jan 19, 2015 2:31 pm
- Has thanked: 0 time
- Been thanked: 0 time
![]() by TazzI » Fri Mar 27, 2015 2:59 am
by TazzI » Fri Mar 27, 2015 2:59 am
Yeah agreed, I rather a unit that has a connectable power supply and interchangeable parts.
Simply incase I manage to put a 300+ degree soldering ion onto the cable!
Id say you want to stick with the finest nozzle for the hot air. Otherwise a large nozzle will cover too much area and affect other components.
Simply incase I manage to put a 300+ degree soldering ion onto the cable!
Id say you want to stick with the finest nozzle for the hot air. Otherwise a large nozzle will cover too much area and affect other components.
![]() by Robertau » Fri Mar 27, 2015 7:30 pm
by Robertau » Fri Mar 27, 2015 7:30 pm
FUCK yeah i rocked that shit, half hours practice destroying a old cd rom last night removing chips at random  , then picking smaller and smaller ones out of groups with mostly success, i tonight removed the eeprom off the board, and managed a clean read EE number lines up. will upload the dump here soon as i figure out how to. Oh wait maybe its this add attachment button lets see how i go.
guess uploads is still broken
once its fixed ill share the dump
next to mount a dip8 socket and drop a chip in.
Robert
guess uploads is still broken
once its fixed ill share the dump
next to mount a dip8 socket and drop a chip in.
Robert
- Robertau
- Starting Ignition
- Posts: 67
- Joined: Mon Jan 19, 2015 2:31 pm
- Has thanked: 0 time
- Been thanked: 0 time
![]() by Robertau » Mon Mar 30, 2015 11:28 am
by Robertau » Mon Mar 30, 2015 11:28 am
Ok so may have been a little excited in my last post!
things went good soldering leads on to mount a dip8 socket to my test cluster, eeproms i got (93c56 under that PU27) dont seem to work in the board get a half a P shape in the LHS lcd thats about all. its nothing i have done soldering wise because the original rom in a sop8 to dip 8 works in the setup, will look at getting more sop8 in the same part number (93c56w6)and sockets or something to suit.
Will these ones work they have the same 93c56w6, but bit worried about the mention of 2.5v
http://www.ebay.com.au/itm/371085126792 ... EBIDX%3AIT
Really thinking about getting a dump off the HI-series XR cluster, have solder paste, so could refit the chip after cleaning up.
i can now thanks to frankieh for finding the info, and lukeyson for the OP reprogram the ba/bf HIM module for Duel zone air con, Manuel air con or heater only
post copied across
Robert
things went good soldering leads on to mount a dip8 socket to my test cluster, eeproms i got (93c56 under that PU27) dont seem to work in the board get a half a P shape in the LHS lcd thats about all. its nothing i have done soldering wise because the original rom in a sop8 to dip 8 works in the setup, will look at getting more sop8 in the same part number (93c56w6)and sockets or something to suit.
Will these ones work they have the same 93c56w6, but bit worried about the mention of 2.5v
http://www.ebay.com.au/itm/371085126792 ... EBIDX%3AIT
Really thinking about getting a dump off the HI-series XR cluster, have solder paste, so could refit the chip after cleaning up.
i can now thanks to frankieh for finding the info, and lukeyson for the OP reprogram the ba/bf HIM module for Duel zone air con, Manuel air con or heater only
post copied across
You need to set the protocol to 11 bit CAN, 512k. atsp6 I think is what you want. The 'a' you mentioned above leaves the ELM in auto mode and should do the same thing, but if it doesn't find 11 bit can 512, it will start looking for the PCM on other protocols. SO in this case either would work.
The HIM responds to messages with a CAN header of 733.
Then you need to use a mode 3B command to program the HIM, which according to J2190 is 'write by data block'.
In this case the HIM mode is block 00. And the values are:
0F - Heater only mode
55 - Manual Climate Control
AA - Auto Climate Control.
So setting a HIM to Manual would be:
ATSP6
ATSH733
3B 00 55
To see that this value is written correct, you do a mode 21 read of block 00. Which is simply
21 00
When you issue a command to header 733, expect to get a response message with a header of 738. SO the purpose of doing the ath1 command is to turn headers on so in the response you can see the 738 bit.
Finally, if the mode 21 lookup shows the value written correctly, you may need to completely power off to have the value take effect. This may even include disconnecting the battery.....
Lukeyson
Robert
- Robertau
- Starting Ignition
- Posts: 67
- Joined: Mon Jan 19, 2015 2:31 pm
- Has thanked: 0 time
- Been thanked: 0 time
![]() by TazzI » Mon Mar 30, 2015 3:55 pm
by TazzI » Mon Mar 30, 2015 3:55 pm
Ah thats pretty cool! Wonder what else is tucked away in the other DID locations. eg 01,02,03,04.
Would have to probe them all to see what ones are supported.
Would have to probe them all to see what ones are supported.
![]() by Robertau » Tue Mar 31, 2015 12:08 pm
by Robertau » Tue Mar 31, 2015 12:08 pm
TazzI wrote:Ah thats pretty cool! Wonder what else is tucked away in the other DID locations. eg 01,02,03,04.
Would have to probe them all to see what ones are supported.
might take a look later thats just 21 01, 21 02, etc? have to forgive me new to these PID's and have not allot of understanding of it
other locations may store the CTS calibration factor unless thats in the ICC or BEM.
- Robertau
- Starting Ignition
- Posts: 67
- Joined: Mon Jan 19, 2015 2:31 pm
- Has thanked: 0 time
- Been thanked: 0 time
![]() by TazzI » Tue Mar 31, 2015 12:59 pm
by TazzI » Tue Mar 31, 2015 12:59 pm
Yeah that's right.
21 01
21 02
Ect
Other "secret" DIDs are generally in higher values like 86 or E0 ect. Have to scan through them all to see what's supported, and if any have valuable information like vin, security keys and stuff like that.
Also note, PID means parameter id, which is what you use for reading engine data like rpms,speed.
DID's are programmable parameters which generally hold all major settings.
Id be interested in attacking the BEM and icc... Just those headunits cost a small fortune.